
|
Navigation from your Home screen:
 >

TSD's Delivery and Collection is sold separately. Contact your TSD Sales Representative at sales@tsdweb.com for more information.
If your fleet is integrated with HMA SRC's Delivery and Collection integration, you can use the mobile app to deliver a unit and pick up a customer's vehicle for service, then collect the unit when the repair is complete. For more information about this integration, see "Delivery and Collection with TSD".
Depending on your provider of the integration, or whether you are using the no-partner version, different features may be available to assist with your delivery and collection process.
Delivery and Collection: With TSD
How to Add a Delivery or Collection
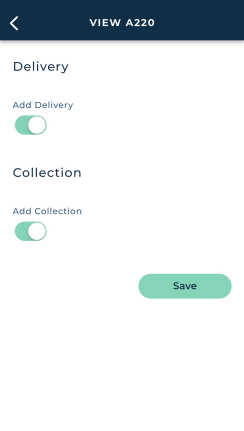
- Access the Delivery and Collection section of the agreement.
- To mark an agreement as requiring delivery of the unit to the customer:
- Tap the Add Delivery toggle (
 ).
- Enter the address. (A button is available to clear the entered address.)
- (Optional.) Tap to view the estimated distance (Est. Distance) and travel time (Est. Travel Time) from your location to the destination address, along with a message in red if the destination is a certain distance away from your location.
- To mark an agreement as requiring collection of the unit from the customer:
- Tap the Add Collection toggle ().
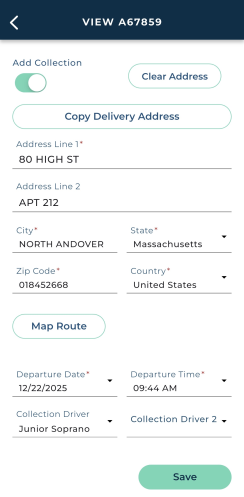
- Enter the address. (A button is available to clear the entered address, along with a button to use the delivery address.)
- (Optional.) Tap to view the estimated distance (Est. Distance) and travel time (Est. Travel Time) from your location to the destination address, along with a message in red if the destination is a certain distance away from your location.
- Save. Tap . The appropriate tag is added to the record, so when you search for the agreement, you can easily identify it as needing delivery or collection.
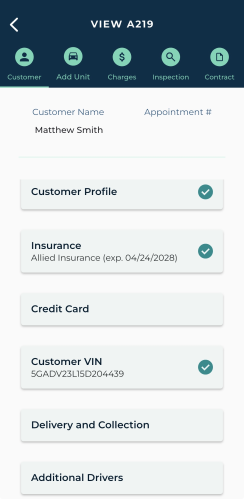
Agreements on mobile have a Delivery and Collection section within the Customer stepper.
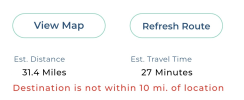
When a route is mapped, a button becomes available to refresh, and a button becomes available to view the destination on a map.
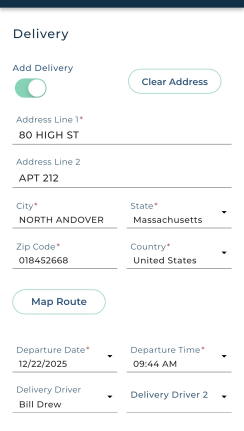
When a route is mapped, a button becomes available to refresh, and a button becomes available to view the destination on a map.
For Drivers: View Today's Trips
Prepare for your day by viewing your scheduled trips, contacting the customer, if needed, and viewing the destination addresses on a map.
- Tap the My Trips card on your Dashboard or access from the main menu ( > ).
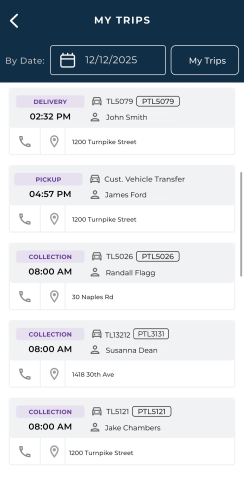
- The My Trips screen shows today's scheduled delivery and collection trips to which you are assigned as the driver. (View all other trips by tapping the My Trips filter to clear it, and change the departure date as needed to view other trips.)
- Call the customer. Tap the call icon (
 ) to call the customer's ph
- View the address on a map. Tap the location icon (
 ) to view the destination on a map and get directions.
- Start the trip. Tap the trip record. If no driver is currently assigned, you are prompted with the option to assign yourself as the driver. "Assign yourself as driver and start the trip?" Tap START TRIP or CANCEL to go back.
For Drivers: How to Deliver a Unit
Note: Even though you're using the mobile app for deliveries and collections, appointments must be created either directly in HMA SRC on the web, or through your integrated web scheduler. Once booked, you can open an agreement or start a trip from the mobile app.
When an appointment or agreement requires a delivery to bring a unit to the customer, the driver can start the trip from the mobile app.
- Tap the My Trips card on your Dashboard.
- The My Trips screen shows today's scheduled deliveries and collections, as well as customer vehicle transfer (CVT) pickups and returns to which you are assigned as the driver. (View all other trips by tapping the My Trips filter to clear it, and change the departure date as needed to view other trips.)
- Tap the trip record to start the trip. If no driver is currently assigned, you are prompted with the option to assign yourself as the driver. "Assign yourself as driver and start the trip?" Tap START TRIP or CANCEL to go back.
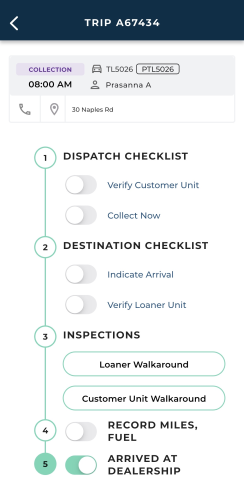
- Use the Trip Checklist to toggle through each step of the trip. Each item can only be toggled on once.
Note: If this is an appointment, the appointment is automatically opened into an Incomplete Pre-Delivery agreement, where you as assigned as the Driver (even if there was a previous driver assigned).
However, if this is an appointment still in Pending Trip Details / Pending Details status, which means it still requires additional trip information, the app displays the following message: "Trip Details needed before delivery can begin."
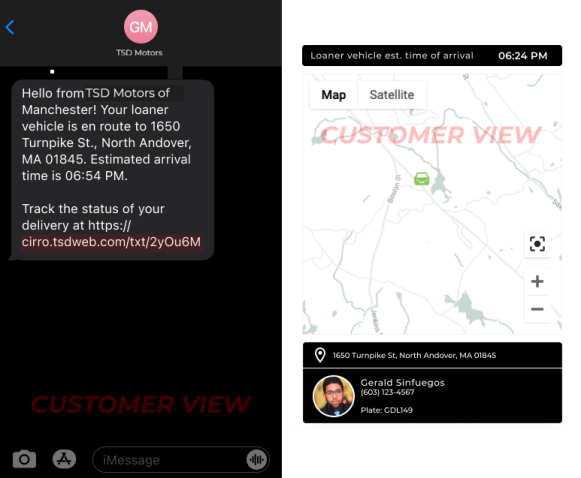
Important Note: Keep your TSD mobile app open during the trip, if your location is using the Driver GPS Tracking component of the feature.
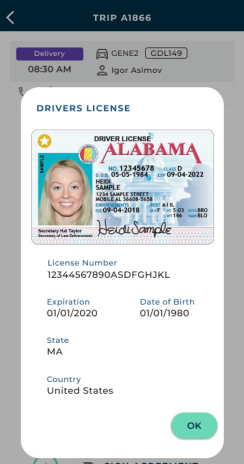
 Verify Loaner Unit


For Drivers: How to Collect a Unit
When an agreement requires a collection to retrieve the unit from the customer and bring it back to your location, the driver can start the trip from the mobile app.
- Tap the My Trips card on your Dashboard.
- This shows scheduled trips to which you are assigned as the driver. (View all other trips by tapping the My Trips filter to clear it.)
- Tap the record to start the trip.
- Use the Trip Checklist to toggle through each step of the trip. Each item can only be toggled on once.
Important Note: Keep your TSD mobile app open during the trip, if your location is using the Driver GPS Tracking component of the feature.
Open a Customer Vehicle Transfer (CVTs)
For situations in which a customer wants service pickup and return of an automobile but doesn't need a loaner or rental vehicle, you can use Customer Vehicle Transfers (CVTs).
These records track the pickup and/or return of the customer's vehicle and service, but has no unit assigned from your fleet. See "TSD's Delivery and Collection: Customer Vehicle Transfers (CVTs)" for more information about how this works on the web.
Note: CVT agreements can only be opened from CVT appointments booked directly in HMA SRC, or through your integrated web scheduler.
Pick Up a Customer's Vehicle for Service
When a CVT appointment is booked and it's time to pick up the customer's automobile for service, the driver can start the trip from the mobile app.
- View today's trips from the Dashboard or main menu. Tap a trip to start. (The list includes trips, including pickups, to which you are assigned the driver.) See "For Drivers: View Today's Trips" for more information about this screen.
-
Use the Trip Checklist to toggle through each step of the trip. Each item can only be toggled on once.
Important Note: Keep your TSD mobile app open during the trip, if your location is using the Driver GPS Tracking component of the feature.
Return a Customer's Vehicle After Service
After service on the customer's vehicle is complete and it's time to return the vehicle to the customer, the driver can start the trip using the mobile app.
- View today's trips from the Dashboard or main menu. Tap a trip to start. (The list includes trips, including returns, to which you are assigned the driver.) See "For Drivers: View Today's Trips" for more information about this screen.
-
Use the Trip Checklist to toggle through each step of the trip. Each item can only be toggled on once.
Important Note: Keep your TSD mobile app open during the trip, if your location is using the Driver GPS Tracking component of the feature.
Delivery and Collection: With No Partner
How to Add a Delivery or Collection
Agreements on mobile have a Delivery and Collection section within the Customer stepper.
To mark an agreement as requiring delivery of the unit to the customer, tap the Add Delivery toggle (). To mark an agreement as requiring collection of the unit from the customer, tap the Add Collection toggle ().
When you're finished, tap . The appropriate tag is added to the record, so when you search for the agreement, you can easily identify it as needing delivery or collection.
© 2026 TSD Rental, LLC